
1. 介绍
MediaPipe是一款由Google开发并开源的数据流处理机器学习应用开发框架。它是一个基于图的数据处理管线,用于构建使用了多种形式的数据源,如视频、音频、传感器数据以及任何时间序列数据。 MediaPipe是跨平台的,可以运行在嵌入式平台(树莓派等),移动设备(iOS和Android),工作站和服务器上,并支持移动端GPU加速。 使用MediaPipe,可以将机器学习任务构建为一个图形的模块表示的数据流管道,可以包括推理模型和流媒体处理功能。

2. 实战
2.1 环境搭建
本项目开发基于Anaconda,Python版本3.8。使用如下指令搭建环境:
conda install -c conda-forge opencv
conda install -c conda-forge ffmpeg
pip install mediapipe
#如果显示没有合适版本的mediapipe,使用如下指令更新pip包
python -m pip install --upgrade pip
2.2 详细步骤
2.2.1 使用CV开启摄像头
import cv2
import mediapipe as mp
import time

#使用openCV加载摄像头,参数为摄像头编号
cap = cv2.VideoCapture(0)

while True:
    success, img = cap.read()
    cv2.imshow("Image", img)
    cv2.waitKey(1)
2.2.2 加载手部检测模块
import cv2
import mediapipe as mp
import time

#使用openCV加载摄像头,参数为摄像头编号
cap = cv2.VideoCapture(0)

#加载手部检测模型
mpHands = mp.solutions.hands
hands = mpHands.Hands() #有默认参数可以不设置。分别为静态图像模式;最大手数量;最小检测自信;最小追踪自信

while True:
    success, img = cap.read()

    #因为手部检测模型接收RGB,因此需要转换
    imgRGB = cv2.cvtColor(img, cv2.COLOR_BGR2RGB)
    results = hands.process(imgRGB)

    cv2.imshow("Image", img)
    cv2.waitKey(1)
2.2.3 显示特征点与连接线
results.multi_hand_landmarks返回的landmarks(以下简称handLms)结构如下:
id,即每个handLms的编号(因为有21个,因此每一次识别会返回编号0-20各一次)
x,y,z的坐标。其中x,y的坐标是以比例的形式返回的。需要乘以长和宽才能以坐标的形式表现。
import cv2
import mediapipe as mp
import time

#使用openCV加载摄像头,参数为摄像头编号
cap = cv2.VideoCapture(0)

#加载手部检测模型
mpHands = mp.solutions.hands
hands = mpHands.Hands() #有默认参数可以不设置。分别为静态图像模式;最大手数量;最小检测自信;最小追踪自信
mpDraw = mp.solutions.drawing_utils #m加载ediapipe自带的绘制方法

while True:
    success, img = cap.read()

    #因为手部检测模型接收RGB,因此需要转换
    imgRGB = cv2.cvtColor(img, cv2.COLOR_BGR2RGB)
    results = hands.process(imgRGB)
    #print(results.multi_hand_landmarks)

    if results.multi_hand_landmarks:
        for handLms in results.multi_hand_landmarks:
            mpDraw.draw_landmarks(img, handLms, mpHands.HAND_CONNECTIONS)

    cv2.imshow("Image", img)
    cv2.waitKey(1)
2.2.4 显示FPS
import cv2
import mediapipe as mp
import time

#使用openCV加载摄像头,参数为摄像头编号
cap = cv2.VideoCapture(0)

#加载手部检测模型
mpHands = mp.solutions.hands
hands = mpHands.Hands() #有默认参数可以不设置。分别为静态图像模式;最大手数量;最小检测自信;最小追踪自信
mpDraw = mp.solutions.drawing_utils #m加载ediapipe自带的绘制方法

#显示FPS
pTime = 0
cTime = 0


while True:
    success, img = cap.read()

    #因为手部检测模型接收RGB,因此需要转换
    imgRGB = cv2.cvtColor(img, cv2.COLOR_BGR2RGB)
    results = hands.process(imgRGB)
    #print(results.multi_hand_landmarks)

    if results.multi_hand_landmarks:
        for handLms in results.multi_hand_landmarks:
            mpDraw.draw_landmarks(img, handLms, mpHands.HAND_CONNECTIONS)

    #计算FPS
    cTime = time.time()
    fps = 1/(cTime-pTime)
    pTime = cTime

    #显示FPS
    cv2.putText(img, str(int(fps)), (10, 70), cv2.FONT_HERSHEY_PLAIN, 3, (255, 0, 255), 3)
    cv2.imshow("Image", img)
    cv2.waitKey(1)
2.2.5 寻找指定点
import cv2
import mediapipe as mp
import time

#使用openCV加载摄像头,参数为摄像头编号
cap = cv2.VideoCapture(0)

#加载手部检测模型
mpHands = mp.solutions.hands
hands = mpHands.Hands() #有默认参数可以不设置。分别为静态图像模式;最大手数量;最小检测自信;最小追踪自信
mpDraw = mp.solutions.drawing_utils #m加载ediapipe自带的绘制方法

#显示FPS
pTime = 0
cTime = 0


while True:
    success, img = cap.read()

    #因为手部检测模型接收RGB,因此需要转换
    imgRGB = cv2.cvtColor(img, cv2.COLOR_BGR2RGB)
    results = hands.process(imgRGB)
    #print(results.multi_hand_landmarks)

    if results.multi_hand_landmarks:
        for handLms in results.multi_hand_landmarks:
            for id, lm in enumerate(handLms.landmark):
                #转换landmark比例到实际坐标
                h, w, c = img.shape
                cx, cy = int(lm.x * w), int(lm.y * h)
                #寻找指定点,如4号
                if id == 4:
                    cv2.circle(img, (cx, cy), 15, (255, 0, 255), cv2.FILLED)


            mpDraw.draw_landmarks(img, handLms, mpHands.HAND_CONNECTIONS)

    #计算FPS
    cTime = time.time()
    fps = 1/(cTime-pTime)
    pTime = cTime

    #显示FPS
    cv2.putText(img, str(int(fps)), (10, 70), cv2.FONT_HERSHEY_PLAIN, 3, (255, 0, 255), 3)
    cv2.imshow("Image", img)
    cv2.waitKey(1)
2.3 模块化
import cv2
import mediapipe as mp
import time

class handDetector():
    def __init__(self, mode = False, maxHands = 2, detectionCon = 0.5, trackCon = 0.5):
        self.mode = mode
        self.maxHands = maxHands
        self.detectionCon = detectionCon
        self.trackCon = trackCon

        #加载手部检测模型
        self.mpHands = mp.solutions.hands
        self.hands = self.mpHands.Hands(self.mode, self.maxHands, self.detectionCon, self.trackCon) #有默认参数可以不设置。分别为静态图像模式;最大手数量;最小检测自信;最小追踪自信
        self.mpDraw = mp.solutions.drawing_utils #m加载ediapipe自带的绘制方法


    def findHands(self, img, draw = True):
        #因为手部检测模型接收RGB,因此需要转换
        imgRGB = cv2.cvtColor(img, cv2.COLOR_BGR2RGB)
        self.results = self.hands.process(imgRGB)
        #print(results.multi_hand_landmarks)

        if self.results.multi_hand_landmarks:
            for handLms in self.results.multi_hand_landmarks:
                if draw:
                    self.mpDraw.draw_landmarks(img, handLms, self.mpHands.HAND_CONNECTIONS)
        return img


    #获取某一个点的坐标
    def findPosition(self, img, handNo = 0, draw = True):
        lmList = []
        if self.results.multi_hand_landmarks:
            myHand = self.results.multi_hand_landmarks[handNo]
            for id, lm in enumerate(myHand.landmark):
            #转换landmark比例到实际坐标
                h, w, c = img.shape
                cx, cy = int(lm.x * w), int(lm.y * h)
                lmList.append([id, cx, cy])
                if draw:
                    cv2.circle(img, (cx, cy), 15, (255, 0, 255), cv2.FILLED)

        return lmList

def main():
    #显示FPS
    pTime = 0
    cTime = 0

    #使用openCV加载摄像头,参数为摄像头编号
    cap = cv2.VideoCapture(0)
    detector = handDetector()

    while True:
        success, img = cap.read()
        img = detector.findHands(img)
        lmList = detector.findPosition(img)
        if len(lmList) != 0:
            print(lmList[4])

        #计算FPS
        cTime = time.time()
        fps = 1/(cTime-pTime)
        pTime = cTime

        #显示FPS
        cv2.putText(img, str(int(fps)), (10, 70), cv2.FONT_HERSHEY_PLAIN, 3, (255, 0, 255), 3)
        cv2.imshow("Image", img)
        cv2.waitKey(1)


if __name__ == "__main__":
    main()
2.4 引用此模块
import cv2
import mediapipe as mp
import time

import sys
sys.path.append('C:/Users/Hellpoet/ML/HandTrackingProject/HandTrackingModule')
import HandTrackingModule as htm

pTime = 0
cTime = 0

#使用openCV加载摄像头,参数为摄像头编号
cap = cv2.VideoCapture(0)
detector = htm.handDetector()

while True:
    success, img = cap.read()
    img = detector.findHands(img)
    lmList = detector.findPosition(img)
    if len(lmList) != 0:
        print(lmList[4])

    #计算FPS
    cTime = time.time()
    fps = 1/(cTime-pTime)
    pTime = cTime

    #显示FPS
    cv2.putText(img, str(int(fps)), (10, 70), cv2.FONT_HERSHEY_PLAIN, 3, (255, 0, 255), 3)
    cv2.imshow("Image", img)
    cv2.waitKey(1)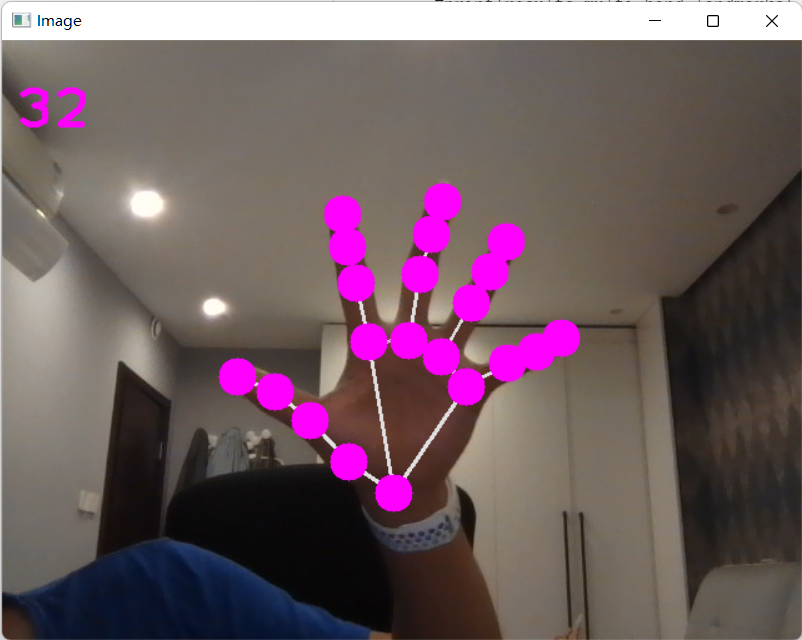
文章评论